How to Plan a Trip Step by Step: A Complete 9-Step Guide
To plan a trip, work through nine steps in order: pick your destination and dates, set a budget, book transport and a place to stay, build a day-by-day itinerary, make a packing list, gather your documents, run a pre-departure checklist, track spending during the trip, and save your memories after. Doing the steps in this order means every decision builds on the one before it, so nothing gets booked twice or forgotten.
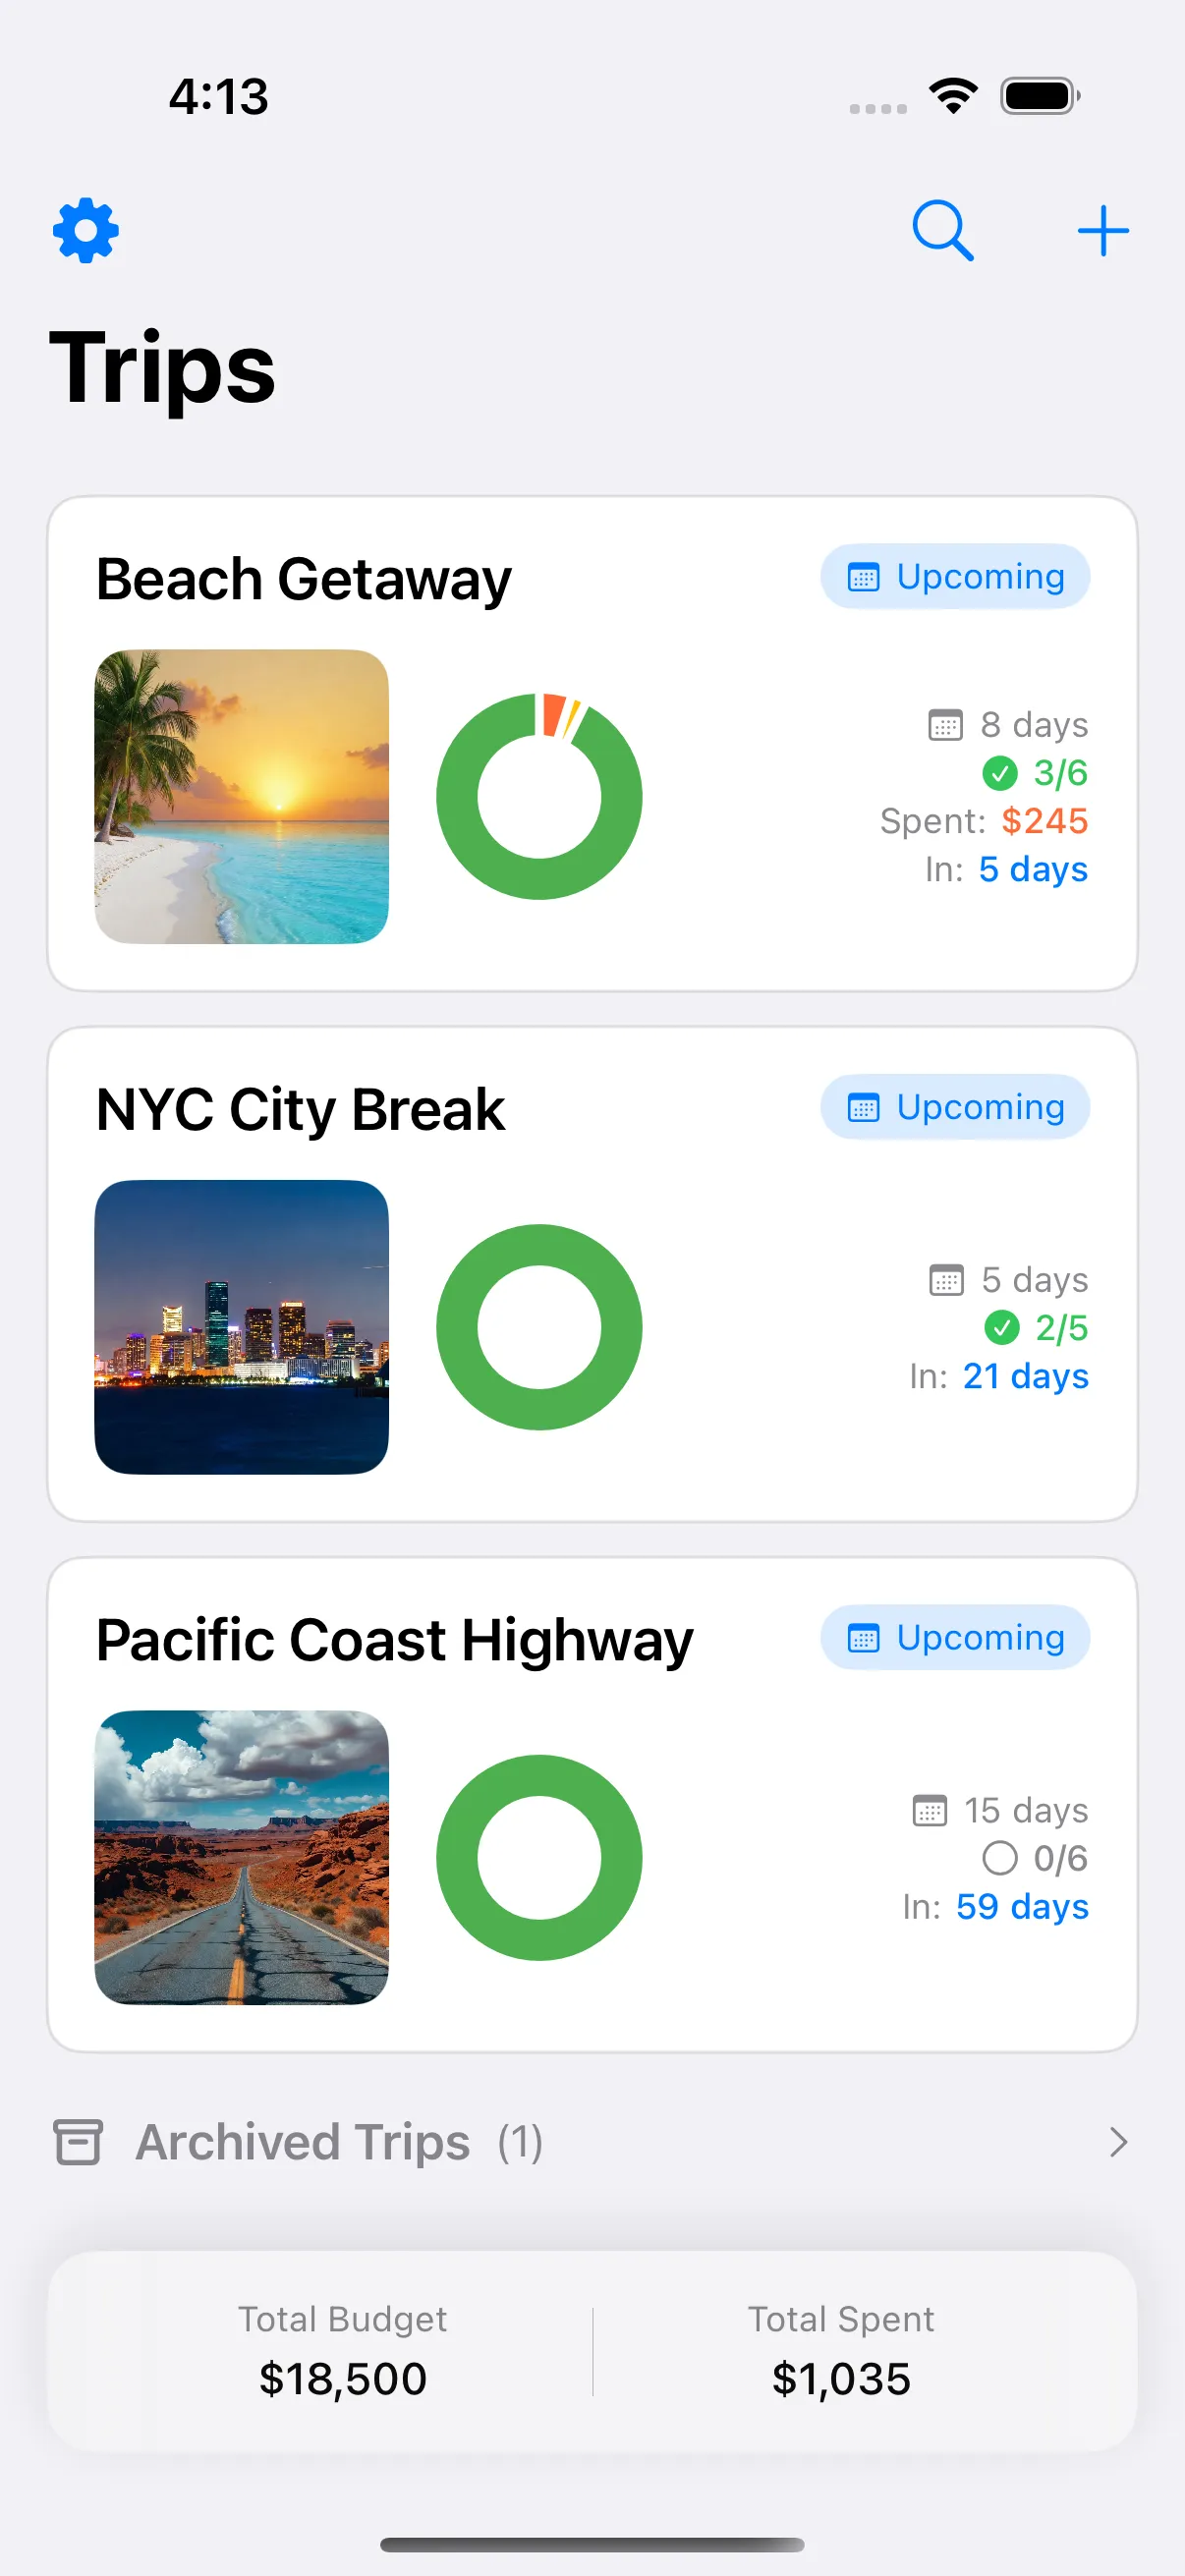
How do you plan a trip from start to finish?
The easiest way to learn how to plan a trip is to treat it as nine steps done in a fixed order. Each step feeds the next: you can’t set a realistic budget until you know the destination, you can’t build an itinerary until transport is booked, and you can’t pack until you know what the itinerary demands.
Here are the nine steps:
- Pick your destination and dates
- Set your budget
- Book transport and a place to stay
- Build a day-by-day itinerary
- Make your packing list
- Gather your documents
- Run a pre-departure checklist
- Track spending and plans during the trip
- Save your memories after you get home
Steps 1–3 are the big decisions and usually happen weeks or months out. Steps 4–7 fill the final two weeks. Steps 8 and 9 happen during and after the trip itself. The rest of this guide walks through each one.
Step 1: Pick your destination and dates
Everything else in trip planning hangs on these two choices, so make them first and make them firm.
If you already know where you’re going, decide the dates by checking three things:
- Weather and season. Look up what the destination is actually like during your window — rainy season, peak heat, or winter closures can reshape a whole trip.
- Local events and holidays. A festival can be the reason to go, or the reason hotels are triple the price.
- Your own calendar. Count the real days you have, including travel days. A “one-week trip” with two full days of flying is a five-day trip on the ground.
If you don’t know where to go yet, work backwards from constraints: how many days you have, roughly what you can spend, and what kind of trip you want (city, beach, hiking, family visit). Two or three candidate destinations usually survive that filter, and comparing flight prices between them settles it.
Write the decision down as a real trip — name, destination, start and end dates — not as a vague idea. A trip with dates on it is a trip you’ll actually plan.
Step 2: Set your budget
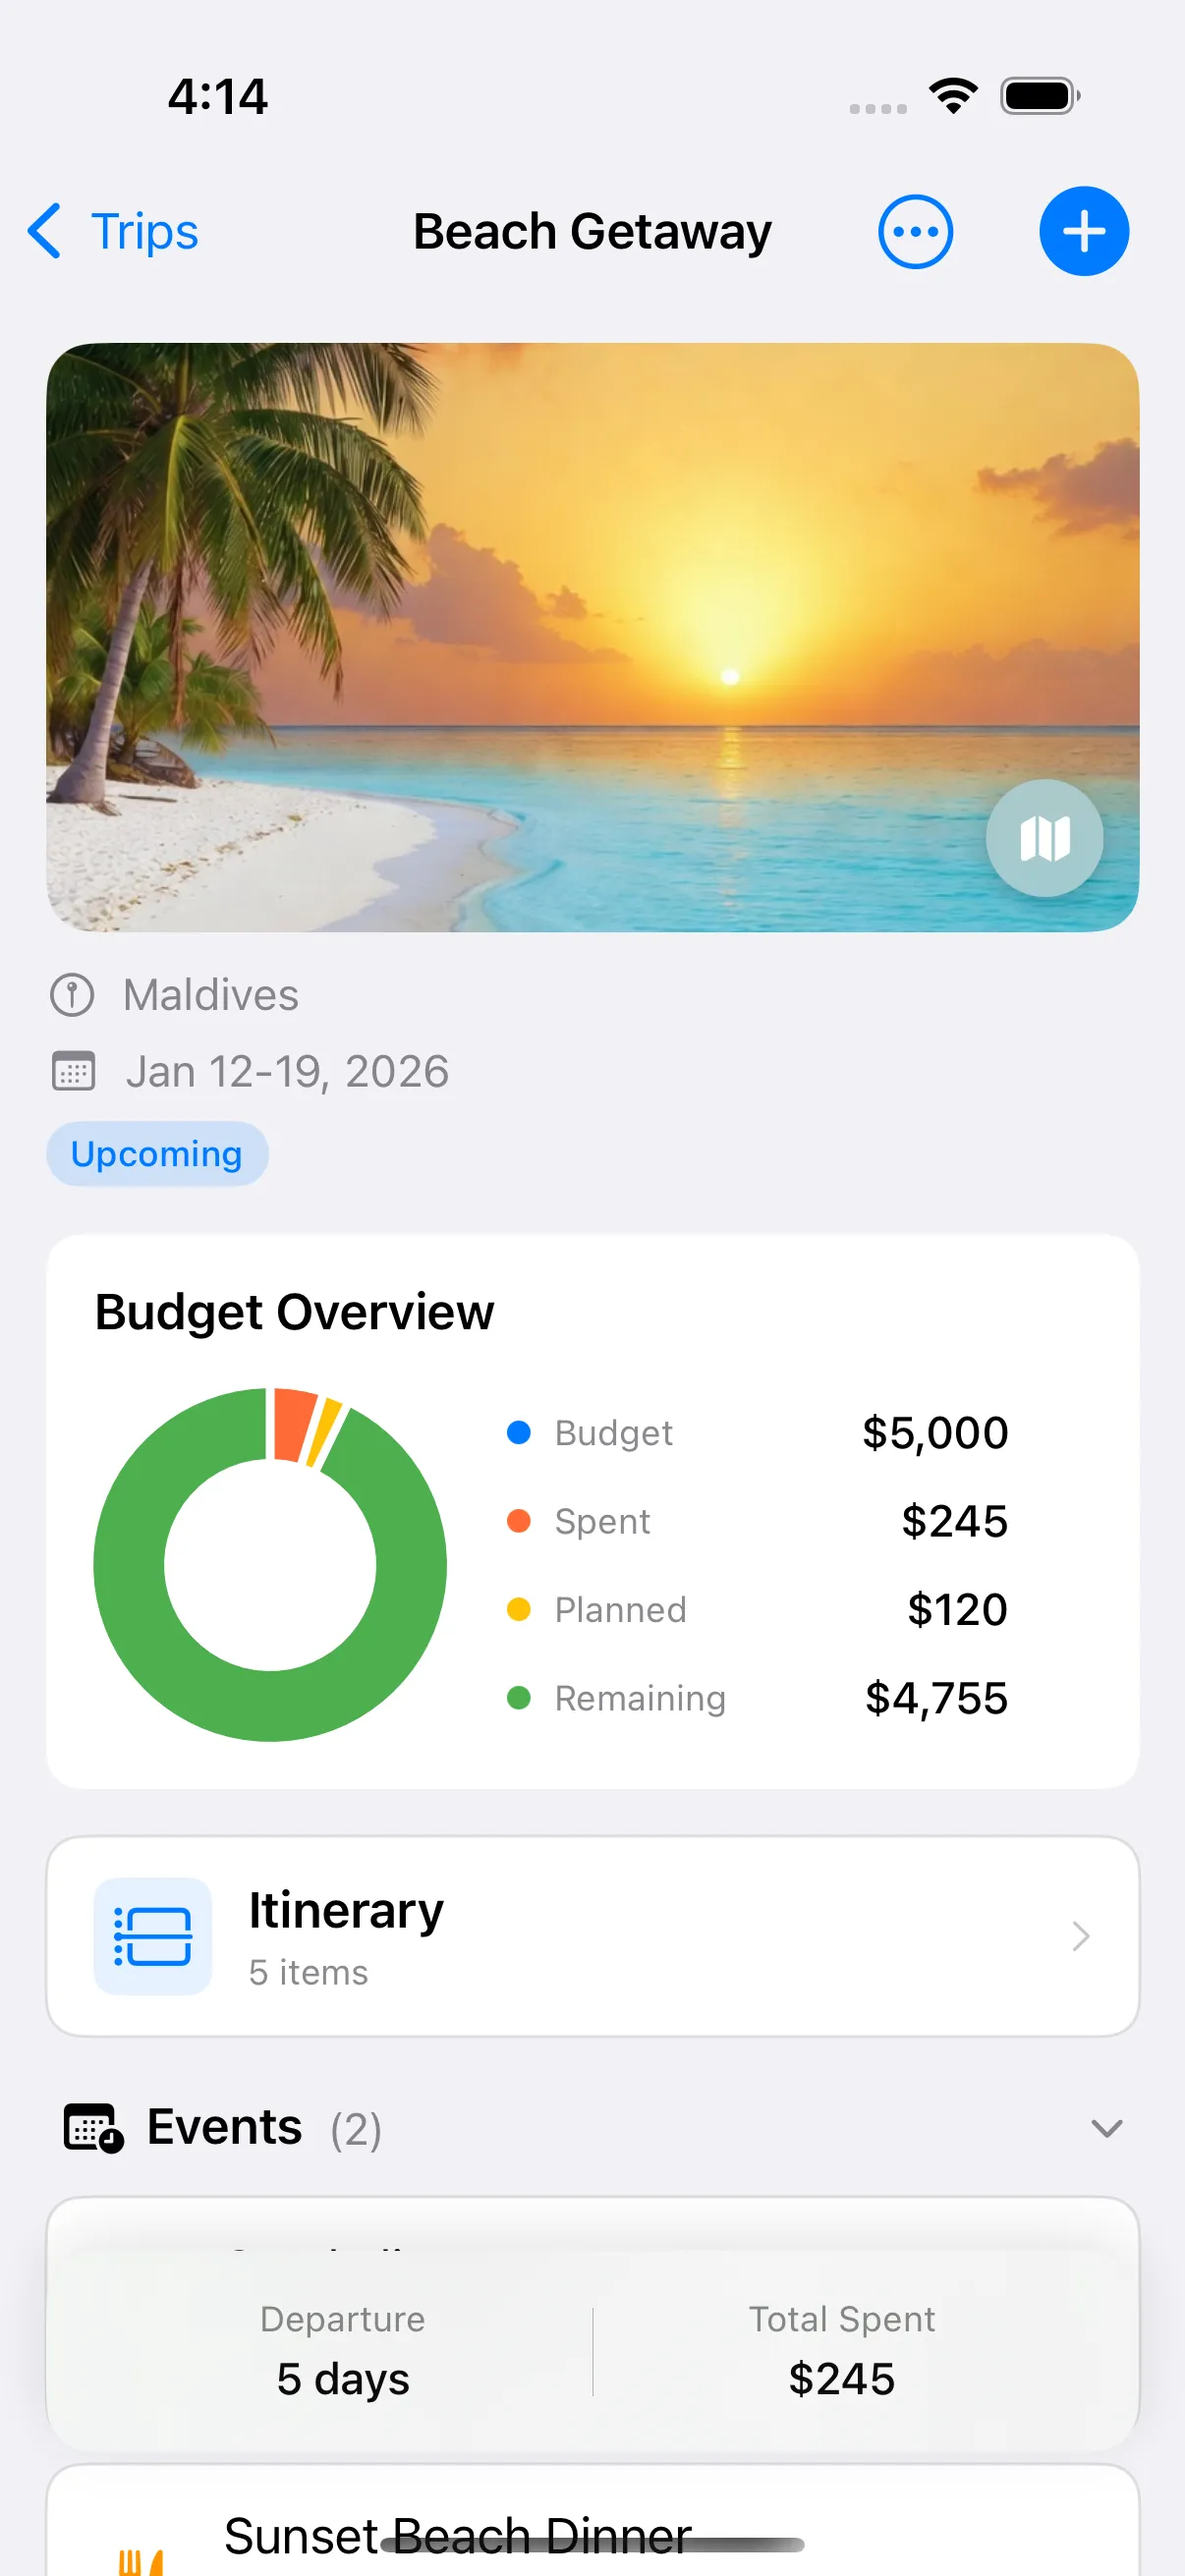
Set the budget before you book anything, not after. Once you’ve spent money on flights, the budget stops being a plan and becomes an excuse.
Start with one total number you’re comfortable spending. Then split it into categories:
| Category | What it covers |
|---|---|
| Transport | Flights, trains, fuel, airport transfers, local transit |
| Lodging | Hotels, rentals, campsites |
| Food | Restaurants, groceries, coffee |
| Activities | Tours, tickets, entrance fees |
| Buffer | 10–15% for the things you didn’t predict |
The buffer matters more than the exact split. Almost every trip has an unplanned expense — a taxi in the rain, a checked bag fee, a restaurant that was too good to skip. Budgeting for surprise means surprises don’t wreck the plan.
For a deeper walkthrough of setting each category and adjusting when prices come in higher than expected, see the full guide on how to budget for a trip.
Step 3: Book transport and a place to stay
Book in this order: long-distance transport first, lodging second, everything else after.
Transport first because it’s usually the largest single cost and the least flexible. Flight and train times fix the skeleton of your trip — arrival day, departure day, and how much usable time you really have.
Lodging second because the where and when now have hard edges. Match check-in and check-out to your actual arrival and departure times, and check the cancellation terms before you pay.
For each booking, save three things the moment you make it:
- The price — so your budget tracking is real, not estimated
- The confirmation number — the one thing every front desk and check-in counter asks for
- A copy of the confirmation itself — the email or PDF, stored where you can open it without hunting through your inbox
Doing this per booking, as you go, takes seconds. Reconstructing it all from email search the night before departure takes an hour and misses things.
Step 4: Build a day-by-day itinerary
With transport and lodging booked, you finally know your real days on the ground. Now build the itinerary — day by day, not as one long wish list.
Work in two passes:
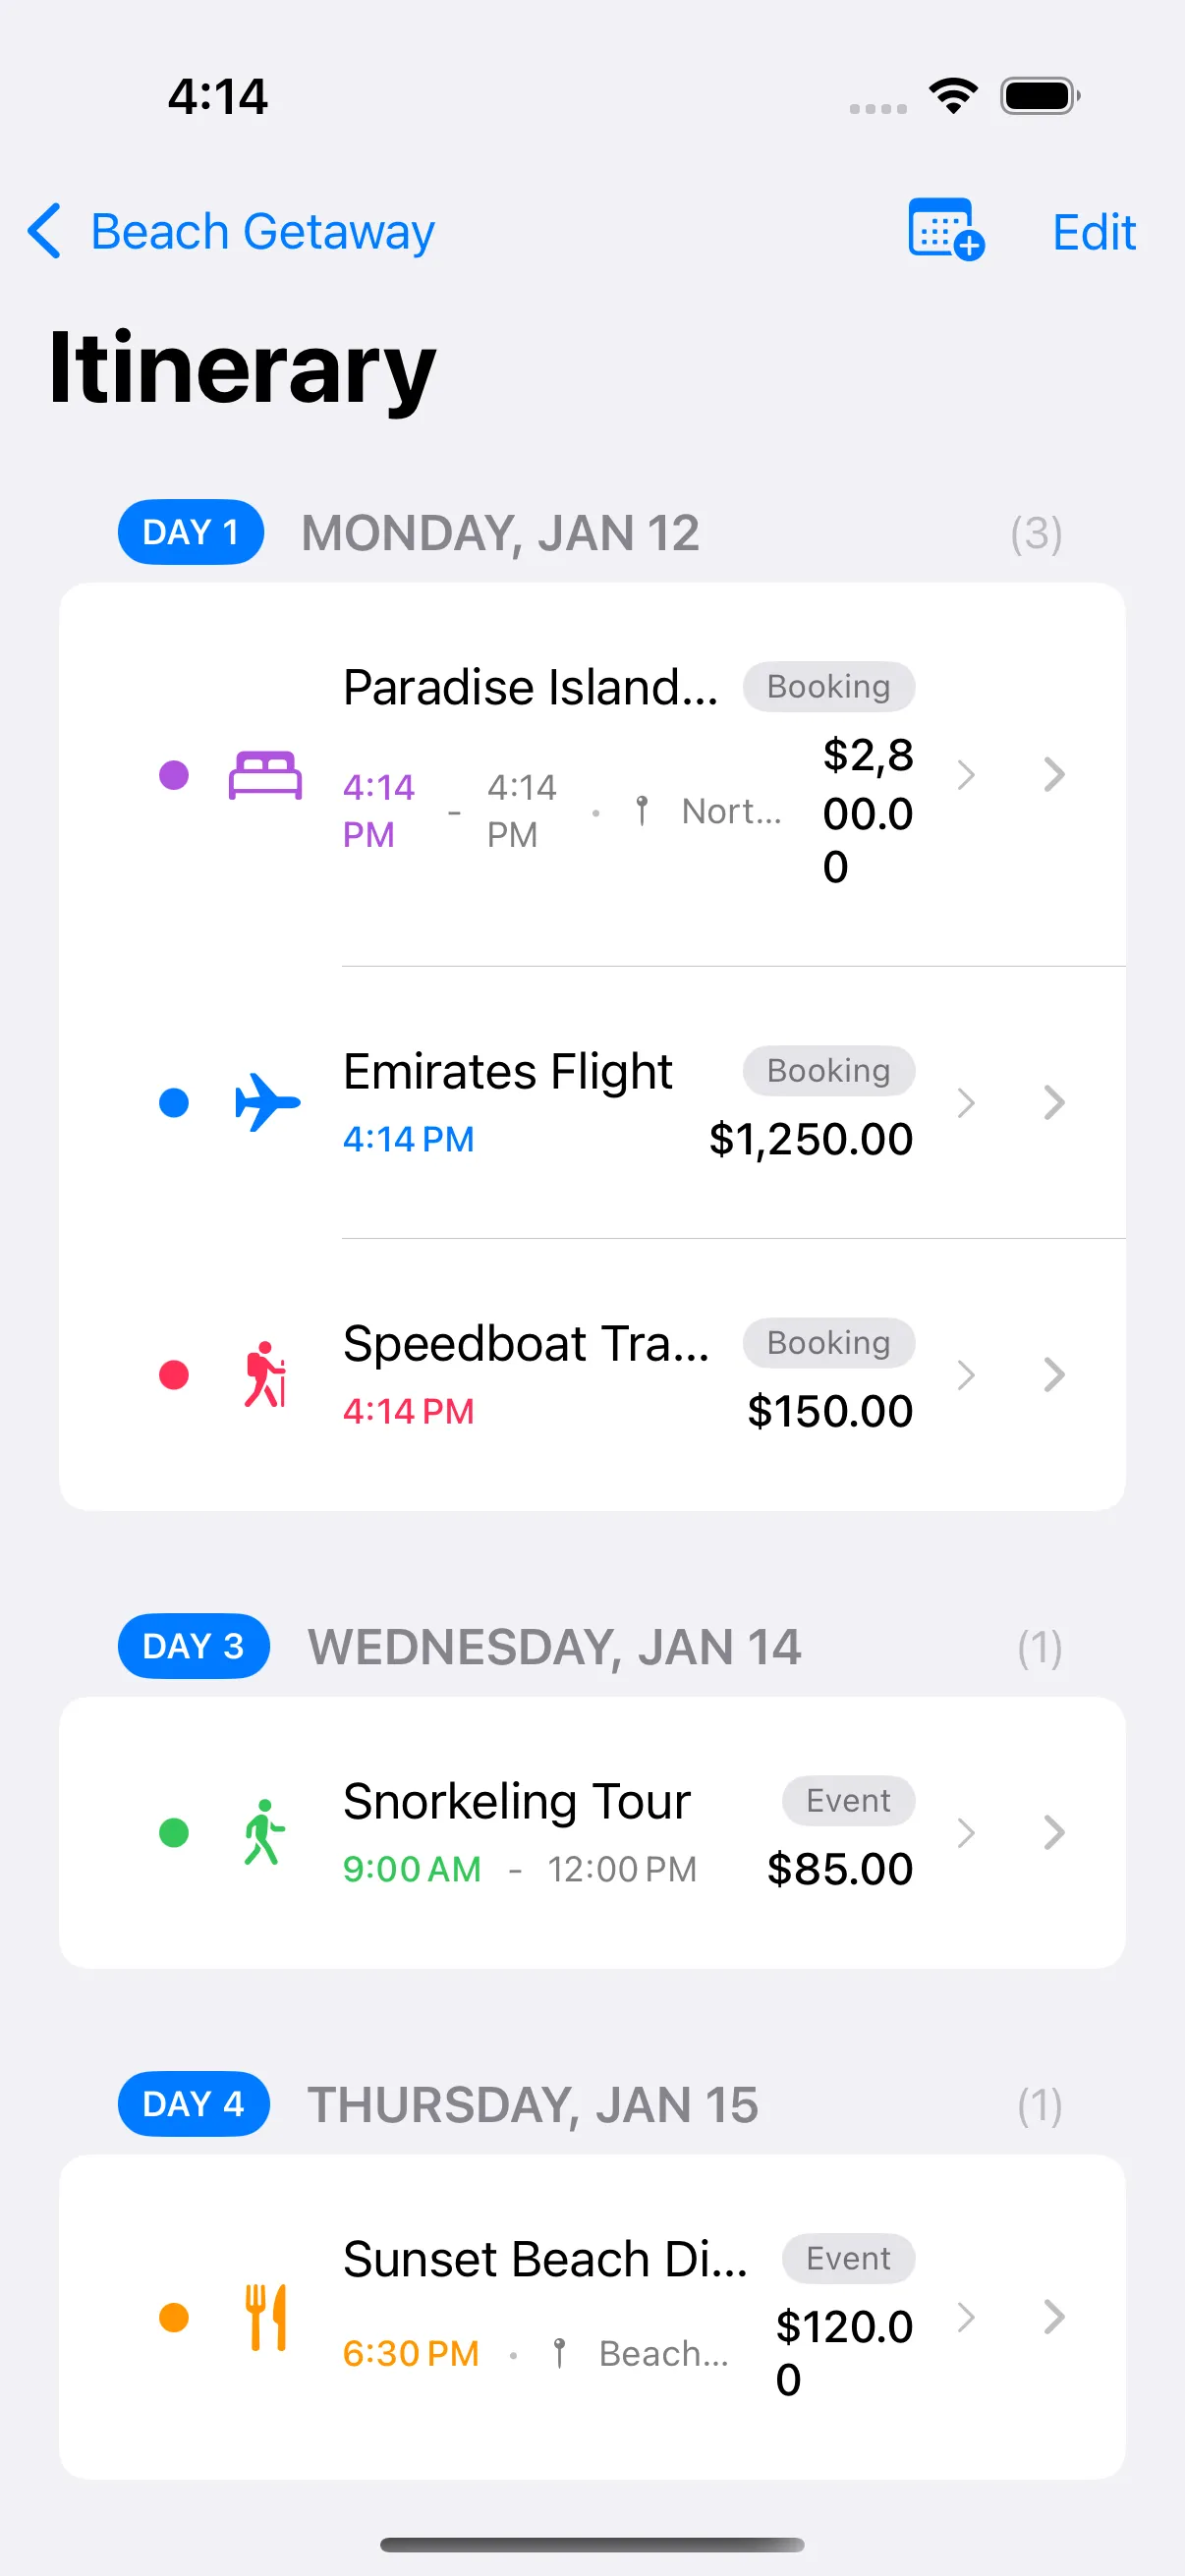
Pass 1: place the fixed items. Flights, check-ins, check-outs, and anything with a timed ticket go in first, with exact times. These are the walls of the schedule; everything else fits around them.
Pass 2: add one or two anchors per day. An anchor is the thing that day is for — a museum, a hike, a day trip, a dinner reservation. One anchor per day is relaxed; two is full; three is a forced march. Leave the space between anchors open on purpose. The unplanned hours are where trips get good.
A few practical rules:
- Group by geography. Put things that are near each other on the same day. Criss-crossing a city twice a day burns hours in transit.
- Go easy on arrival day. After a long flight, plan a walk and a good dinner, not a packed schedule.
- Check opening days. Museums close on Mondays more often than you’d think. Verify before you anchor a day on one.
Keep the itinerary somewhere you’ll actually look at it during the trip — which in practice means on your phone, and available offline, since you won’t always have a connection when you need it. Travel Stories keeps your itinerary, bookings, packing list, and budget in one offline app — free on the App Store.
Step 5: Make your packing list
Start the packing list at least a week out — not because packing takes a week, but because the gaps do. Discovering you need an adapter, a swimsuit, or a prescription refill is only a problem when there’s no time left to fix it.
Build the list from the itinerary, not from memory:
- Weather at the destination during your dates decides the clothing layer by layer.
- Activities decide the gear: hiking days need different shoes than museum days.
- Trip length decides quantities — and whether you’re doing laundry mid-trip.
Write the list down and check items off as they go in the bag. A mental list fails exactly when you’re rushed, which is always. For a complete item-by-item breakdown — clothing, toiletries, electronics, documents, and the things people forget most — use the packing list for international travel. To skip the writing entirely, the packing list generator produces a checklist for your trip type, length and climate that you can tick off, print, or download. Where the destination itself changes the list, start from one built for it — Japan in winter and Italy in summer need different things from you than the generic version knows about.
Step 6: Gather your documents
Documents are the step with the longest worst-case: a passport renewal can take weeks, and some visas take longer. Check requirements as soon as your destination is set, then gather everything in the final two weeks.
The core set for international trips:
- Passport — valid for at least six months past your return date for many destinations; check your destination’s specific rule
- Visa — if required; check the official government source, not a forum
- Travel insurance — the policy document and the emergency phone number
- Booking confirmations — flights, lodging, rental cars, tours
- Boarding passes — as they become available at check-in
Keep digital copies of all of them in one place that works offline. Airport basements, airplanes, and foreign SIM-card gaps are exactly where you need documents and exactly where connections fail. A trip planner with built-in document storage means the boarding pass, the hotel confirmation, and the insurance policy are all one tap away in the same app as the itinerary.
Step 7: Run a pre-departure checklist
The final week is about the trip around the trip: the house, the money, the health prep, the tech. None of it is glamorous, and all of it is the difference between leaving relaxed and leaving frazzled.
The short version:
- Home: arrange pet/plant care, pause deliveries, empty the fridge of anything that won’t survive, take out the trash, check locks and windows
- Money: notify your bank of travel if needed, get a small amount of local currency, confirm your cards work abroad
- Health: refill prescriptions, pack a small first-aid kit, check any recommended vaccinations well in advance
- Tech: download offline maps, sort out roaming or an eSIM, charge everything, pack the right adapters
The complete version, organized by timeline from two weeks out to the day you leave, is in the travel checklist before leaving. Run it as a real checklist — items checked off, not skimmed — and the day of departure gets remarkably calm.
Step 8: Track spending and plans during the trip
Planning doesn’t stop at the departure gate; it just gets lighter. Two habits keep a trip on track while it’s happening:
Log expenses as they happen. A ten-second entry after each meaningful purchase — dinner, tickets, a taxi — keeps the budget honest. The point isn’t accounting; it’s the early warning. If day three shows you’re burning through the food budget twice as fast as planned, you can adjust with five days of trip left instead of finding out at the credit card statement.
Glance at tomorrow, tonight. Each evening, look at the next day’s itinerary for two minutes. Confirm the anchor activity’s opening time, figure out roughly how you’ll get there, and note anything that needs booking. This tiny ritual prevents most mid-trip scrambles.
If your budget and itinerary live in the same app, both habits together take less time than ordering a coffee.
Step 9: Save your memories after you get home
The trip isn’t quite done when you land. Two short tasks in the first week home lock in the value of everything you planned:
Close out the budget. Add the final expenses and look at the totals per category. This is the most useful trip-planning data you’ll ever get — your own actual numbers. Next time you plan a similar trip, you’ll budget from evidence instead of guesses.
Save the memories while they’re fresh. Pull the best photos into a trip timeline, and jot the notes you’ll want later: the restaurant worth returning to, the neighborhood you’d stay in next time, the thing you packed and never used. A week later half of it is gone; a month later most of it is.
Trips you document well become trips you plan better from. The ninth step of this trip quietly becomes the first step of the next one.
Put it into practice
Pick your next trip — even a rough idea with a month attached — and run it through the nine steps above, starting with dates and a budget today. Travel Stories, a free iPhone app that works offline with no account needed, gives every one of these steps a home: trips with dates and budgets, day-by-day itineraries, bookings with confirmation numbers, document storage, packing lists, expense tracking with charts, and a photo timeline for afterwards.
Ready-made packing lists for this
Free, no sign-up: tick items off in the browser, print it, or adjust it to your own trip.
What to pack for Japan in winter
A winter Japan packing list built around what actually catches visitors out: constant shoe removal, cash-only counters, brutal indoor heating, and tiny hotel rooms.
What to pack for Italy in summer
An Italian summer packing list built around three realities: church dress codes, cobblestones, and 35°C afternoons. Includes what to wear and what to leave home.
Two-week Europe packing list
A multi-city Europe list built around the bag you carry up a fourth-floor walk-up: one laundry stop, three plug types, and 15°C of variation between north and south.
Honeymoon packing list
A honeymoon packing list including the thing that ruins them: booking in a married name your passport doesn't have yet. Plus resort dress codes and the certificate worth carrying.
Or build one from scratch with the packing list generator.
Frequently asked questions
How far in advance should I plan a trip?
For international trips, start two to three months out so you have time for flights, lodging, and any visa paperwork. Domestic trips and road trips can come together in two to four weeks. The booking steps need the most lead time; the itinerary and packing list can be done in the final two weeks.
What should I plan first when planning a trip?
Destination and dates come first, because everything else depends on them. Prices, weather, what to pack, and what documents you need all change based on where and when you go. Once those two decisions are locked, set your budget before booking anything.
How detailed should a trip itinerary be?
Plan one or two anchor activities per day and leave the rest open. Fixed items like flights, check-ins, and timed tickets go in first with exact times. Over-scheduling every hour is the most common itinerary mistake — you lose the ability to linger somewhere good or recover from a delay.
How do I keep track of all my trip bookings?
Keep every booking in one place with its price and confirmation number, rather than scattered across email threads. Store copies of the documents themselves — boarding passes, reservations, insurance — somewhere you can open without an internet connection. A trip planner app that works offline covers both.
How do I plan a trip on a budget?
Set a total number before you book anything, then split it across categories: transport, lodging, food, activities, and a buffer. Book the two biggest costs — transport and lodging — first, so you know exactly what remains for everything else. Track spending against the budget during the trip so surprises show up early, not at the end.
Keep reading

How to Budget for a Trip: A Simple Travel Budget That Works
Build a travel budget in six categories, split it with a simple rule of thumb, add a 10-15% buffer, and track spending as you go. Worked example included.

Packing List for International Travel: The Complete Checklist
A copy-paste packing list for international travel: documents, carry-on essentials, the 5-4-3-2-1 clothing formula, tech, meds, and what to leave home.
Travel Checklist: Everything to Do Before Leaving Home
The complete pre-departure travel checklist — what to do 2 weeks out, 1 week out, the day before, and the day you leave, from documents to door locks.